ESP32-P4: The High-Performance Powerhouse for Embedded Innovation
The ESP32-P4 is a cutting-edge microcontroller designed for demanding applications, featuring a powerful dual-core processor, abundant peripherals, and advanced connectivity options.
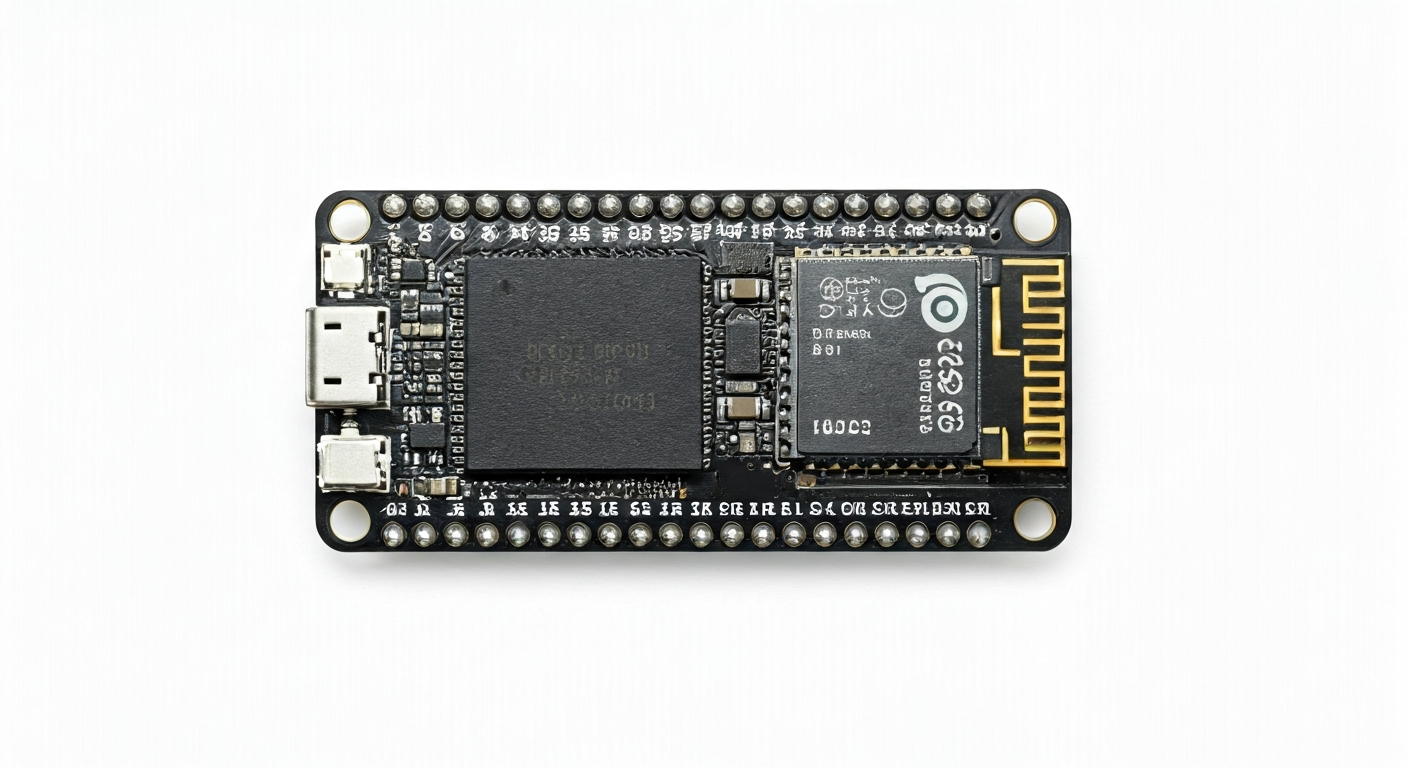
The ESP32-P4 represents a significant leap forward in Espressif's Systems-on-Chip (SoC) portfolio, targeting applications that require substantial processing power and a rich set of peripherals. Unlike its predecessors that focused on Wi-Fi and Bluetooth connectivity as primary features, the ESP32-P4 shifts its emphasis towards high-performance computing and advanced I/O capabilities, making it suitable for complex embedded systems, industrial automation, and sophisticated IoT devices.
At the heart of the ESP32-P4 is a dual-core RISC-V processor, capable of running at speeds up to 600 MHz. This powerful architecture, combined with a generous amount of on-chip SRAM and dedicated memory controllers, allows for the execution of complex algorithms, machine learning inference, and real-time operating systems. The SoC also integrates a dedicated graphics accelerator, enabling rich user interfaces and display output, a feature not commonly found in previous ESP32 variants.
Positioned as a premium offering within the ESP32 family, the ESP32-P4 is designed for makers, students, and embedded engineers who need more than what standard microcontrollers can offer. Its extensive peripheral set includes multiple high-speed communication interfaces, advanced timers, and robust security features. This board is ideal for projects demanding significant computational resources, graphical capabilities, or intricate control over hardware, pushing the boundaries of what's possible in embedded development.
The ESP32-P4 is a relatively new entrant, with its development and release occurring around 2024. It caters to a more advanced user base looking to build sophisticated products and prototypes. Its capabilities make it a strong contender for applications such as advanced human-machine interfaces (HMIs), real-time data processing systems, embedded vision projects, and complex control systems where performance and flexibility are paramount.
Watch
Related video, embedded from YouTube.
Specifications
| Microcontroller / SoC | ESP32-P4 |
| Architecture | Dual-core RISC-V 64-bit (RV64IMAC) |
| Clock speed | Up to 600 MHz |
| Flash / Storage | External SPI flash up to 128MB (via Octal SPI) |
| RAM / SRAM | 16MB PSRAM, 512KB internal SRAM |
| Operating voltage | 3.3V |
| Digital I/O pins | Up to 45 configurable GPIOs |
| Analog / ADC | Up to 20x 12-bit ADC channels |
| PWM | Multiple PWM channels with advanced features |
| Connectivity | Wi-Fi 6 (802.11ax), Bluetooth 5.2 (LE) |
| USB | USB 2.0 OTG (Host/Device) |
| Power input | USB-C, VIN pin |
| Dimensions | Typically ~52mm x 25mm (module dependent) |
Pinout & pin functions
| Pin | Function |
|---|---|
| 3V3 | 3.3V Power Output |
| GND | Ground |
| VIN | Power Input (typically 5V) |
| EN | Enable Pin (active low) |
| BOOT | Boot Mode Select (active low) |
| GPIO0 | General Purpose Input/Output |
| GPIO1 | General Purpose Input/Output, UART0 TXD |
| GPIO2 | General Purpose Input/Output, UART0 RXD |
| GPIO3 | General Purpose Input/Output, SPI0 MOSI |
| GPIO4 | General Purpose Input/Output, SPI0 MISO |
| GPIO5 | General Purpose Input/Output, SPI0 SCK |
| GPIO6 | General Purpose Input/Output, SPI0 CS0 |
| GPIO7 | General Purpose Input/Output, I2C0 SDA |
| GPIO8 | General Purpose Input/Output, I2C0 SCL |
| GPIO9 | General Purpose Input/Output, PWM0 |
| GPIO10 | General Purpose Input/Output, PWM1 |
| GPIO11 | General Purpose Input/Output, ADC0 |
| GPIO12 | General Purpose Input/Output, ADC1 |
| GPIO13 | General Purpose Input/Output, UART1 TXD |
| GPIO14 | General Purpose Input/Output, UART1 RXD |
| GPIO15 | General Purpose Input/Output, SPI1 MOSI |
| GPIO16 | General Purpose Input/Output, SPI1 MISO |
| GPIO17 | General Purpose Input/Output, SPI1 SCK |
| GPIO18 | General Purpose Input/Output, SPI1 CS0 |
| GPIO19 | General Purpose Input/Output, I2C1 SDA |
| GPIO20 | General Purpose Input/Output, I2C1 SCL |
| GPIO21 | General Purpose Input/Output, PWM2 |
| GPIO22 | General Purpose Input/Output, PWM3 |
| GPIO23 | General Purpose Input/Output, ADC2 |
| GPIO24 | General Purpose Input/Output, ADC3 |
| GPIO25 | General Purpose Input/Output, USB D- |
| GPIO26 | General Purpose Input/Output, USB D+ |
| GPIO27 | General Purpose Input/Output, SDIO D0 |
| GPIO28 | General Purpose Input/Output, SDIO D1 |
| GPIO29 | General Purpose Input/Output, SDIO D2 |
| GPIO30 | General Purpose Input/Output, SDIO D3 |
| GPIO31 | General Purpose Input/Output, SDIO CLK |
| GPIO32 | General Purpose Input/Output, SDIO CMD |
| GPIO33 | General Purpose Input/Output, Camera I2C SDA |
| GPIO34 | General Purpose Input/Output, Camera I2C SCL |
| GPIO35 | General Purpose Input/Output, Camera PCLK |
| GPIO36 | General Purpose Input/Output, Camera HREF |
| GPIO37 | General Purpose Input/Output, Camera VSYNC |
| GPIO38 | General Purpose Input/Output, Camera D0 |
| GPIO39 | General Purpose Input/Output, Camera D1 |
Wiring & circuit basics
Powering the ESP32-P4 board requires attention to its operating voltage, which is 3.3V. Most development boards include an onboard voltage regulator and provide a USB-C port or a VIN pin for power input, typically accepting 5V. When powering via USB-C, the board handles the voltage regulation. If using the VIN pin, ensure you supply a stable 5V source capable of delivering at least 500mA, especially if the board's peripherals (like Wi-Fi or external components) will draw significant current. Avoid applying voltages higher than specified to the 3V3 pin, as this can damage the chip.
The ESP32-P4 operates at 3.3V logic levels. This means that signals sent to and received from the microcontroller should be within the 0V to 3.3V range. Connecting a 5V device directly to a GPIO pin can damage the ESP32-P4. If you need to interface with 5V logic devices, use a level shifter. For example, to connect an LED to a GPIO pin, connect the anode of the LED to a GPIO pin (e.g., GPIO9) and the cathode to a current-limiting resistor (e.g., 220-330 ohms), which is then connected to GND. Ensure the GPIO pin is configured as an output.
When connecting sensors or modules, always check their operating voltage and logic level requirements. For an I2C sensor that operates at 3.3V, you would typically connect its SDA pin to an I2C SDA pin on the ESP32-P4 (e.g., GPIO7) and its SCL pin to an I2C SCL pin (e.g., GPIO8). Both boards also need to share a common ground (GND). If the sensor requires an external pull-up resistor on the SDA and SCL lines, these are often integrated into the ESP32-P4 development board, but it's good practice to verify the schematic or datasheet.
Programming & getting started
The ESP32-P4 can be programmed using several popular development frameworks. The Arduino IDE, with the appropriate ESP32 board support package installed, offers a familiar and accessible environment for many makers. MicroPython and CircuitPython are excellent choices for rapid prototyping and learning, providing a Python-based programming experience. For professional development and access to the full range of hardware features, Espressif's official ESP-IDF (Espressif IoT Development Framework) is the most comprehensive option, offering C/C++ development with extensive libraries and RTOS capabilities. PlatformIO, an integrated development environment for IoT, also supports the ESP32-P4 and integrates well with VS Code.
To upload your first program (e.g., a 'Blink' sketch) using the Arduino IDE: 1. Install the ESP32 board support package. 2. Select the correct ESP32-P4 board from the Tools > Board menu. 3. Connect the ESP32-P4 to your computer via USB. 4. Select the correct COM port. 5. Copy and paste the 'Blink' example code, modifying the LED pin number if necessary. 6. Click the Upload button. The board will typically enter bootloader mode automatically, or you may need to hold down the BOOT button while pressing the RESET button, then release BOOT when the upload starts.