ESP32-WROVER: The Powerhouse Module for Your Next Connected Project
Explore the capabilities of the ESP32-WROVER, a versatile module built around Espressif's powerful ESP32 chip, featuring integrated PSRAM for enhanced memory.
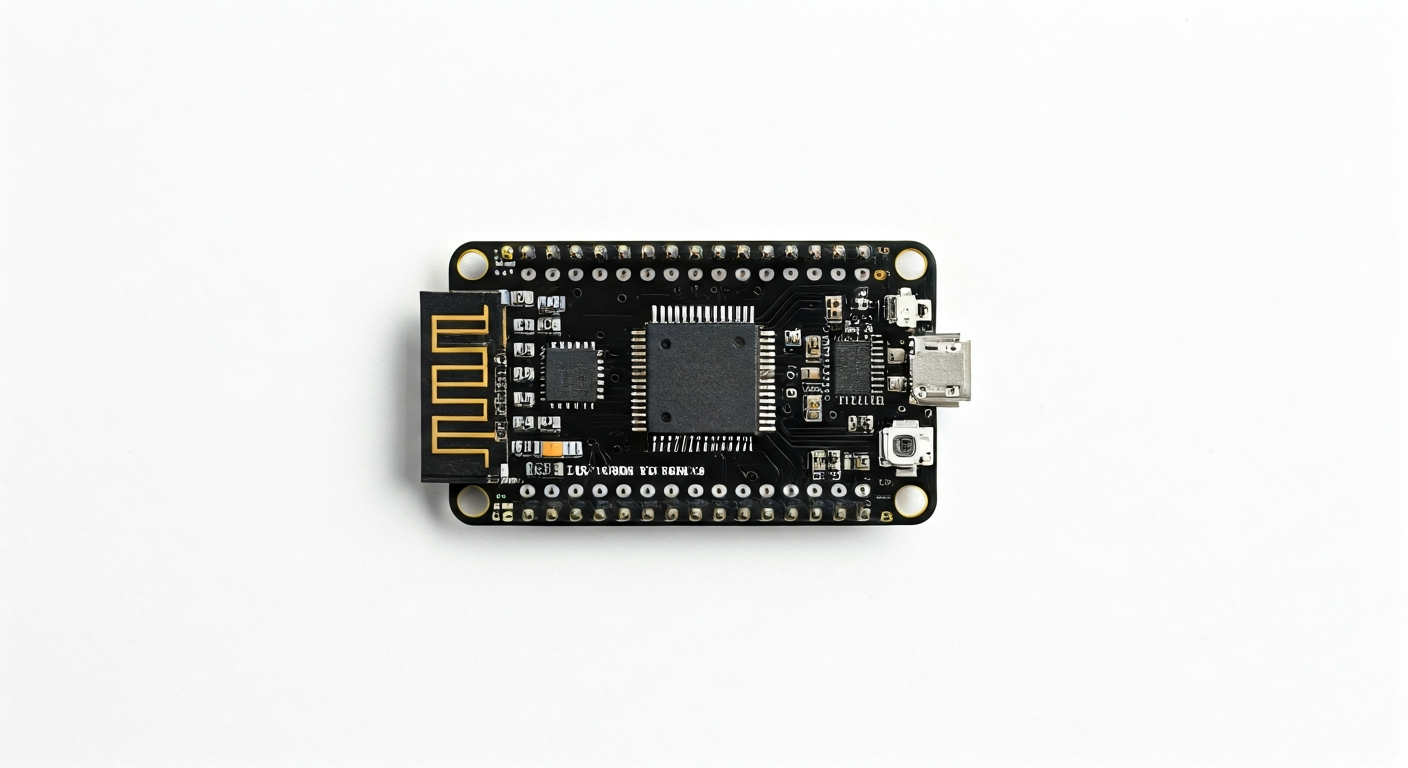
The ESP32-WROVER is not a development board itself, but rather a compact module designed to be integrated into custom PCB designs. It's built around Espressif's highly capable ESP32 System-on-Chip (SoC), which boasts a dual-core Tensilica Xtensa LX6 microprocessor, Wi-Fi, and Bluetooth connectivity. The 'WROVER' designation specifically indicates that this module includes an external PSRAM (Pseudo-Static Random-Access Memory) chip, typically 4MB, significantly boosting the available RAM for more complex applications compared to ESP32 modules without PSRAM.
At its heart, the ESP32-WROVER utilizes the ESP32-D0WDQ6 or similar variants of the ESP32 chip. This SoC is a powerhouse for embedded systems, offering a rich set of peripherals including ADCs, DACs, I2C, SPI, UART, I2S, and more, all controllable via a flexible GPIO matrix. The integrated Wi-Fi (802.11 b/g/n) and Bluetooth (v4.2 BR/EDR and BLE) make it ideal for IoT applications, enabling wireless communication directly from the module without the need for external networking chips.
The ESP32-WROVER module is a popular choice for makers and engineers who need a compact, powerful, and well-connected solution. Its integrated PSRAM makes it particularly suitable for projects requiring more memory, such as running more complex machine learning models on the edge, handling larger data buffers for audio or sensor streams, or developing sophisticated graphical user interfaces. It sits as a premium option within the ESP32 family, offering enhanced capabilities over basic ESP32 modules.
Released around 2017, the ESP32-WROVER quickly became a go-to for developers seeking a balance of performance, connectivity, and memory. Its widespread adoption has led to excellent community support, extensive libraries, and a wealth of example projects. This module is best suited for intermediate to advanced makers and embedded engineers who are comfortable with module-level integration or are using development boards that expose the WROVER's full potential, especially those projects that push the boundaries of typical microcontroller memory limits.
Watch
Related video, embedded from YouTube.
Specifications
| Microcontroller / SoC | ESP32-D0WDQ6 (or similar) with integrated Wi-Fi and Bluetooth |
| Architecture | Dual-core Tensilica Xtensa LX6 |
| Clock speed | Up to 240 MHz |
| Flash / Storage | On-module SPI Flash (typically 4MB or 8MB) |
| RAM / SRAM | 520 KB SRAM + 4MB PSRAM (on module) |
| Operating voltage | 3.0V - 3.6V (typically 3.3V) |
| Digital I/O pins | Up to 34 GPIOs (available on module pins) |
| Analog / ADC | 12-bit SAR ADC, up to 18 channels |
| PWM | Up to 16 channels (LED PWM controller) |
| Connectivity | Wi-Fi 802.11 b/g/n, Bluetooth v4.2 BR/EDR and BLE |
| USB | None directly on module (requires external USB-to-UART bridge for programming/serial) |
| Power input | Typically 3.3V via VCC pin; development boards may offer 5V via USB or VIN |
| Dimensions | Approx. 18.0mm x 25.2mm x 2.8mm (module itself) |
Pinout & pin functions
| Pin | Function |
|---|---|
| 3V3 | Power supply input (3.3V) |
| GND | Ground |
| EN | Enable pin (high to enable chip, low to reset) |
| GPIO0 | Boot mode selection (low during boot to enter flash mode) |
| GPIO2 | General purpose I/O, strapping pin, ADC2_CH2, TOUCH2 |
| GPIO4 | General purpose I/O, ADC2_CH4 |
| GPIO5 | General purpose I/O, strapping pin, ADC2_CH5 |
| GPIO12 | General purpose I/O, strapping pin, ADC2_CH6, MTDI |
| GPIO13 | General purpose I/O, ADC2_CH7, MISO (SPI) |
| GPIO14 | General purpose I/O, TXD0 (UART0), CLK_OUT, DAC_1 |
| GPIO15 | General purpose I/O, strapping pin, RXD0 (UART0), ADC2_CH10 |
| GPIO16 (U0RXD) | UART0 RX, general purpose I/O |
| GPIO17 (U0TXD) | UART0 TX, general purpose I/O |
| GPIO18 | General purpose I/O, SCK (SPI), ADC1_CH0 |
| GPIO19 | General purpose I/O, MOSI (SPI), ADC1_CH1 |
| GPIO21 | General purpose I/O, SDA (I2C), ADC1_CH3 |
| GPIO22 | General purpose I/O, SCL (I2C), ADC1_CH4 |
| GPIO23 | General purpose I/O, MISO (SPI), ADC1_CH5 |
| GPIO25 | General purpose I/O, DAC_2, ADC1_CH8 |
| GPIO26 | General purpose I/O, DAC_1, ADC1_CH9 |
| GPIO27 | General purpose I/O, ADC1_CH10 |
| GPIO32 | General purpose I/O, ADC1_CH4 |
| GPIO33 | General purpose I/O, ADC1_CH2 |
| GPIO34 | Input only, ADC1_CH6 |
| GPIO35 | Input only, ADC1_CH7 |
| VSPI_CS | VSPI Chip Select (GPIO16) |
| VSPI_MOSI | VSPI Master Out Slave In (GPIO23) |
| VSPI_MISO | VSPI Master In Slave Out (GPIO19) |
| VSPI_SCK | VSPI Serial Clock (GPIO18) |
| HSPI_CS | HSPI Chip Select (GPIO15) |
| HSPI_MOSI | HSPI Master Out Slave In (GPIO23) - Shared with VSPI |
| HSPI_MISO | HSPI Master In Slave Out (GPIO19) - Shared with VSPI |
| HSPI_SCK | HSPI Serial Clock (GPIO18) - Shared with VSPI |
| U1RXD | UART1 RX (GPIO9) |
| U1TXD | UART1 TX (GPIO10) |
Wiring & circuit basics
Powering the ESP32-WROVER module requires a stable 3.3V supply. While the module's operating voltage is typically 3.0V to 3.6V, 3.3V is the standard. Ensure your power source can provide sufficient current, especially when Wi-Fi or Bluetooth is active, as peaks can reach several hundred milliamps. Development boards often include voltage regulators to accept a 5V input (e.g., from USB) and step it down to 3.3V for the module. Always connect the GND pin to the ground of your power supply.
It is crucial to remember that the ESP32-WROVER operates at a 3.3V logic level. Connecting 5V signals directly to its GPIO pins can cause permanent damage. If you need to interface with 5V components (like many Arduino Uno peripherals), use a logic level shifter or voltage divider for inputs to the ESP32. For outputs from the ESP32 to 5V devices, check if the 5V device can tolerate a 3.3V signal; otherwise, a level shifter is needed.
A simple example is lighting an LED: Connect a current-limiting resistor (e.g., 220-330 ohms) from a 3.3V GPIO pin (like GPIO2) to the anode of an LED. Connect the cathode of the LED to GND. When the GPIO pin is set HIGH, current flows through the resistor and LED, illuminating it. For an I2C sensor, connect its SDA pin to an ESP32 I2C SDA pin (e.g., GPIO21) and its SCL pin to an ESP32 I2C SCL pin (e.g., GPIO22). Remember to connect both the sensor's VCC and GND to the appropriate 3.3V and GND pins on the ESP32 or its development board.
Programming & getting started
The ESP32-WROVER is highly versatile in its programming options. The most popular methods include the Arduino IDE with the ESP32 board support package installed, MicroPython, CircuitPython, and Espressif's own ESP-IDF (Espressif IoT Development Framework). For beginners, the Arduino IDE offers the easiest entry point due to its familiar syntax and extensive libraries. MicroPython and CircuitPython provide a Python-based development experience, which can be faster for prototyping.
To upload your first program (a 'Blink' sketch for Arduino IDE), connect your ESP32-WROVER development board to your computer via USB. Select the correct ESP32 board from the Tools > Board menu and the corresponding COM port. Ensure GPIO0 is high (usually by default, or by holding a button on some boards) for normal operation. Upload the sketch. For bootloader mode (required for initial flashing or recovery), you typically need to hold down a 'BOOT' or 'FLASH' button while pressing and releasing the 'RESET' button, then release the 'BOOT' button before uploading. The IDE will handle the serial communication and flashing process.